This is an example how to print customer and item specific labels in Dynamics 365 for Finance and Operations. The labels shall be printed directly within the sales order form at the sales line grid.
Configuration Table
Create a new table containing the following five fields. The table will hold the configuration which report and design to use for which combination of customer and item
| Field | Purpose |
| CustAccount | Reference to the Customer |
| ItemId | Reference to an Item |
| ReportName | Name of the SSRS report to use |
| ReportDesign | Name of the report design |
| IsDefault | NoYes |
Create Report Classes
Create a new class called ItemLabelContract, which will be the data contract class for the report. It contains the number of labels to be printed, the SalesId and the LineNum to reference the calling SalesLine.
[DataContractAttribute]
class ItemLabelContract
{
NumberOf numberOf;
SalesId salesId;
LineNum lineNum;[DataMemberAttribute]
public NumberOf parmNumberOf(NumberOf _numberOfLabels = numberOf)
{
numberOf = _numberOfLabels;
return numberOf;
}[DataMemberAttribute]
public SalesId parmSalesId(SalesId _salesId = SalesId)
{
SalesId = _salesId;
return SalesId;
}[DataMemberAttribute]
public LineNum parmLinNum(LineNum _lineNum = LineNum)
{
LineNum = _lineNum;
return LineNum;
}}
Create a new controller class called ItemLabelContract. This class will be called from the menu item in the sales order form. It takes the SalesLine as parameter and decides which report and design to use.
class ItemLabelController extends SrsReportRunController
{
public static void main(Args _args)
{
ItemLabelSetup setup;
SalesLine salesLine = _args.record();ItemLabelController ctrl = new ERPItemLabelController();
ctrl.parmArgs(_args);select firstonly setup where
setup.CustAccount == SalesLine.salesTable().CustAccount &&
setup.ItemId == SalesLine.ItemId;if(setup.RecId == 0)
{
select firstonly setup where
setup.CustAccount == SalesLine.salesTable().CustAccount &&
setup.ItemId == „“;
}if(setup.RecId == 0)
{
select firstonly setup where setup.ItemId == SalesLine.ItemId &&
setup.CustAccount == „“;
}if(setup.RecId == 0)
{
select firstonly setup where setup.IsDefault == NoYes::Yes;
}if(setup.RecId == 0)
{
error(„No report selected“);
}
else
{
str reportName = strFmt(„%1.%2″,
setup.ReportName,
setup.ReportDesign);ctrl.parmReportName(reportName);
ctrl.startOperation();
}}
protected void prePromptModifyContract()
{
ItemLabelContract contract =
this.parmReportContract().parmRdpContract() as ItemLabelContract;SalesLine salesLine = this.parmArgs().record();
contract.parmSalesId(SalesLine.SalesId);
contract.parmLinNum(SalesLine.LineNum);
contract.parmNumberOf(SalesLine.SalesQty);super();
}}
Create a temporary (InMemory) table called ItemLabelTmp for the report data set including the following five columns:
| Field | Purpose |
| ItemId | Item Id |
| ItemName | Name |
| ItemBarcode | Barcode value |
| BarcodeString | Encoded barcode string |
| VendName | Name of the vendor, here “Contoso” |
Create the report data provide class. Overwrite the prePromptModify method and populate the contract with the number of labels to print taken from the SalesQty, the SalesId and LineNum.
[SRSReportParameterAttribute(classStr(ItemLabelContract))]
class ItemLabelDP extends SrsReportDataProviderBase
{
ItemLabelTmp itemLabelTmp;[SrsReportDataSetAttribute(‚ItemLabelTmp‘)]
public ItemLabelTmp getItemLabelTmp()
{
select * from itemLabelTmp;
return itemLabelTmp;
}public void processReport()
{
ItemLabelContract contract = this.parmDataContract()
as ItemLabelContract;
SalesLine salesLine;select firstonly SalesLine where
SalesLine.SalesId == contract.parmSalesId() &&
SalesLine.LineNum == contract.parmLinNum();BarCodeString bcstring = „“;
InventItemBarcode itemBarcode = InventItemBarcode::findItemId(
SalesLine.ItemId,false,false);if(ItemBarCode.RecId > 0)
{
Barcode barcode = Barcode::construct(BarcodeSetup::find(
itemBarcode.barcodeSetupId).barcodeType);
barcode.string(true,ItemBarCode.itemBarCode,
BarcodeContentType::Item);
Barcode.encode();
bcstring = Barcode.barcodeStr();
}for(int i = 0; i < contract.parmNumberOf(); i++)
{
itemLabelTmp.clear();
itemLabelTmp.ItemId = SalesLine.ItemId;
itemLabelTmp.ItemName = SalesLine.itemName();
itemLabelTmp.ItemBarCode = SalesLine.BarCode;
itemLabelTmp.VendName = „Contoso“;
itemLabelTmp.BarCodeString = bcstring;
itemLabelTmp.insert();
}}
}
Create a report with multiple designs
Create a new report and add the report data provider class as source. Create at least two designs. In this example I’ve created two designs, a small and and large label.
Create Menu Items and Forms
Create a new form using a the Simple List pattern to manipulate the configuration table form. Create a new display menu item for the form and add it e.g. to the accounts receivable module.
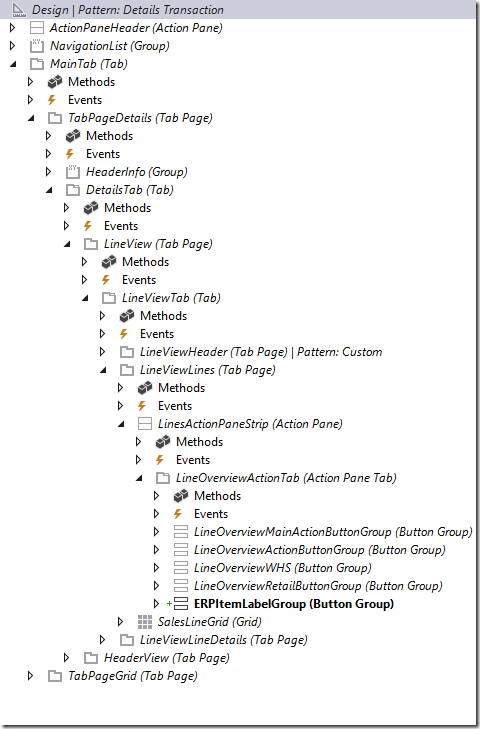
Create a form extension for the SalesTable form. Create an output menu item form the ItemLabelController class and add it to SalesTable extension e.g. Main > TabPageDetails > DetailsTab > LineView > LineViewTab > LineViewLines > LinesActionPaneStrip > LineOverviewActionTab . Make sure to set the SalesLine as Datasource for the Menu Item.
Test the labels
Create new sales orders and test the different configurations and labels. Here is a Youtube example.


