- mPOS – modern POS, which can be directly downloaded from D365Ops.
- ePOS – cloud POS, which can be opened in any browser – so universal, just like the Dynamics 365 for operations itself.
Retail Modern POS configuration and installation:
If you have a valid .onmicrosoft.com account and access to Microsoft Dynamics 365 for Finance and Operations, Enterprise edition solutions via LCS (lifeCycleServices) using that account, then you will be able to find the step-by-step guideline for learning development when you choose the appropriate Methodology.
One such link is to activate and configure a mPOS client pointing out to your D365fFO instance on the cloud and/or on a local VM – https://docs.microsoft.com/en-us/dynamics365/unified-operations/retail/retail-modern-pos-device-activation
Below I have an illustration of how I have setup the locally downloaded mPOS client to connect with a D365fFO instance hosted on Azure cloud.
Step 1) Perform some validations.
- You would need Admin (XXX@YYY.onmicrosoft.com) account which has access to your D365fFO instance.
Good to setup another user with Store Manager role, if it is possible. I have setup an account ZZZ@YYY.onmicrosoft.com (with Store Manager role) to activate the necessary POS Registers and devices in D365fFO and will use the same in below description. - We need to validate if the selected register has the correct basic setup. I have used ‘Houston-3’ as I have Microsoft Demo data in my D365fFO instance and it is suggested to use this store as it is configured accordingly.
Go to Retail > ‘Channel deployment’ workspace and Click Registers tab.
Search and select ‘Houston-3’ and verify that ‘Support offline’ is set to No. If you mark this as Yes, then you would need to install SQL Express on the local machine where you intend to install mPOS.
Step 2) Download Retail mPOS installer
- You can download the mPOS installer and configuration file for that particular store/register/device from D365fFO instance. And it is important that the configuration file is in the same folder as the installer while you run the installer.
Go to Retail > ‘Channel deployment’ workspace and Click Devices tab.
Search and select ‘Houston-3’.
Click on DOWNLOAD button on the Action pane. You would get two options as shown below.
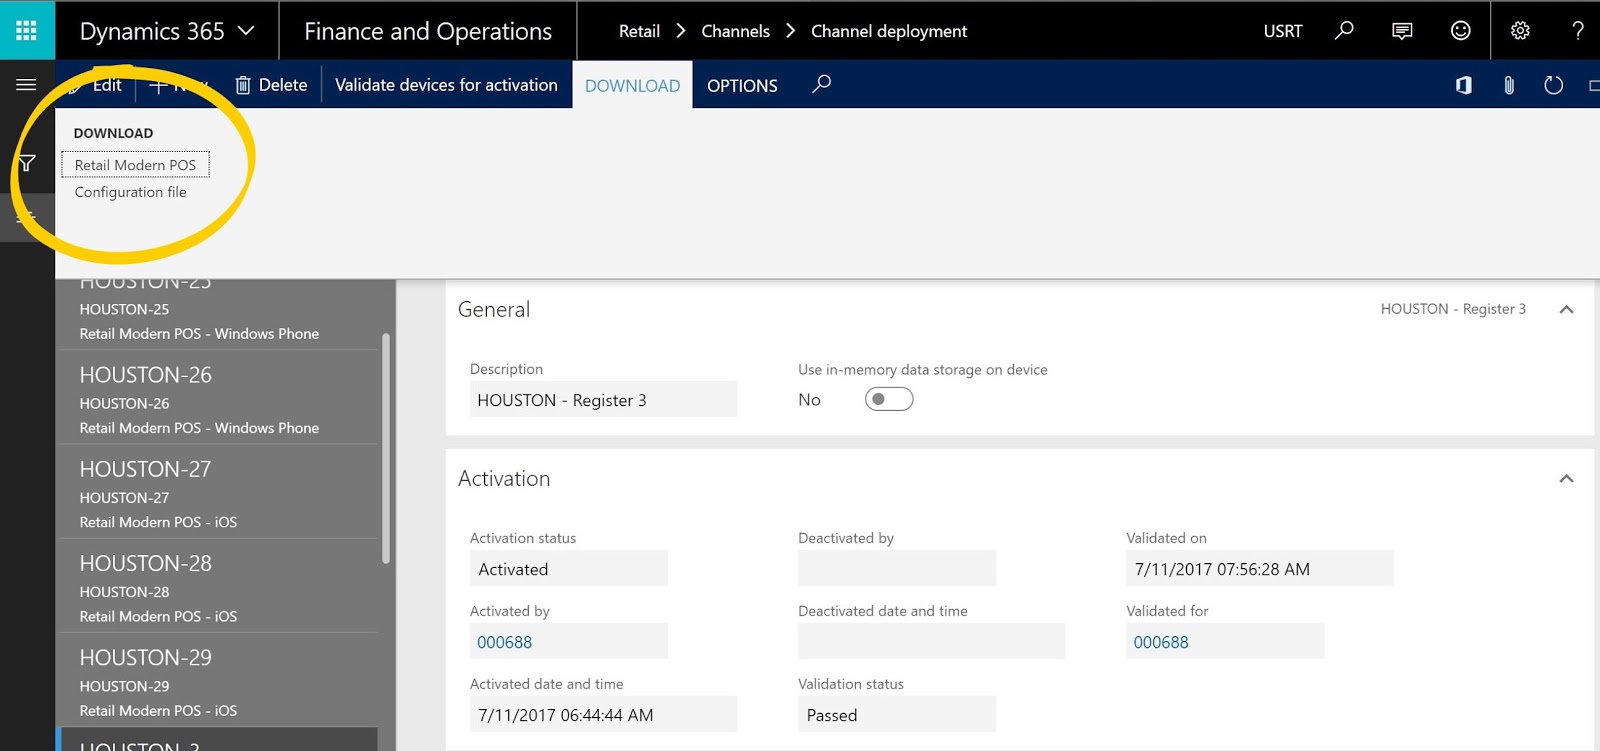
- Download both and run the installer and ensure there are no errors during the installation. Like I said before – it is important that the installer and configuration file are in the same folder.
- Apparently, you should be able to download the installer on any device (Windows Phone, Google Android device, or Apple iOS device) and follow the same procedure to get connected. I haven’t tried it out yet, definitely some to do soon.
Step 3) Create a worker and attach it to the device ‘Houston-3’
- As I intend to connect/operate my mPOS instance with my new user ZZZ@YYY.onmicrosoft.com. I will have to create a new worker and update the configuration accordingly.
Go to Retail > Employees > Workers
Click +New and fill in the madantory ‘First name’ and ‘Last name’ accordingly. (ZZZ, in my case).
Also important to identify the ‘Legal entity’, the worker is going to work with. I choose USRT.
‘Worker type’ is set to Employee. And Employment start date – left is as default, i.e, immediately.
Select the Assign a position check box. Select position number 000544, which is the Store manager position.
Then go ahead and ‘Hire new worker’ - Select the newly created worker and click Edit.
set ‘Language’ = en-us
Under Worker summary, in the ‘Address books’ field, select the Houston store.
On the Retail tab, you can reset the ‘POS password’. I have reset the password to 123.
On the Retail tab, under Screen layout, assign a ‘Screen layout’. I have selected F2MP16:9M (Fabrikam MPOS Manager (16:9)).
and click Save. - Assosciate worker with existing identity.
On the Action Pane, select Retail, and then select Associate existing identity.
In my case, I have searched for user email -ZZZ@YYY.onmicrosoft.com.
Click Ok.
By doing so, the ‘External identity’ section should be automatically populated.
Step 4) Send the updated information to channel database
- It is important that the changes you have made in AX regarding the staffing are transferred to Channel database. So if you don’t have the updates being sent to Channel databases on regular intervals – you will have to follow below steps to send the latest update.
Go to Retail > Periodic > Distribution schedule.
ZZZ@YYY.onmicrosoft.com (using the Operator ID = WorkerID and Retail Password = 123) can sign in to any POS device that is used in the HOUSTON store that he is assigned to.
Select the 1060 – Staff job, and then, on the Action Pane, select Run now to sync the worker data to the channel database.
After the sync is complete, worker
Step 5) Validate Device for Activation check
- Go to Retail > ‘Channel deployment’ workspace and Click Devices tab. Search and select ‘Houston-3’.
Click on ‘Validate devices for activation’ button on the Action pane
Select OK, and verify that you receive the following message: “Pre-Activation validation completed for Device HOUSTON-3 and Staff ******. Validation: Passed”
Step 6) Activate the device (mPOS locally installed)
- Open the newly installed Modern POS instance on your computer.
Select Activate. You will be redirected to the Azure AD sign-in page. Enter your Azure AD account that you mapped earlier, in my case ZZZ@YYY.onmicrosoft.com, and the password (123)
When activation is completed, select Get Started.
Step 7) Login and proceed.
- The first time login would request for a Password change, upon completing that you might have to login again with the new password.
- Also mPOS will pop up a new user experience window/video to help you understand the tasks which can be performed in the POS.

Hope this helps. Cheers!
转载请注明:ww12345678 的部落格 | AX Helper » D365Ops Tip#3: Steps needed to have mPOS up and running!