A typical requirement is to publish documents like Invoice, Purchase Order, etc. to an DMS system like SharePoint. However, in Dynamics AX 2012 and lower there is no built-in functionality to publish these documents to SharePoint. But this requirement can easily be achieved without coding.
Prerequisite
- Install (at least) SharePoint 2013 Foundation incl. SP1. Foundation 2013 SP1 includes all the filters required to process PDF files and a basic search center. By default the configuration wizard creates a new team website collection.
- Make sure the WebClient window service is installed and running. If not, you may have to install the User Interface and Desktop Experience Feature on your server.

Document Library and Content Type
In SharePoint open the Settings ![]() and open the Site Settings. From the User and Permissions group, open “People and Groups”. Select the Group “Owners”, Click “New” and add the Dynamics AX AOS Service account.
and open the Site Settings. From the User and Permissions group, open “People and Groups”. Select the Group “Owners”, Click “New” and add the Dynamics AX AOS Service account.
In SharePoint create a new Document Library. On the team website open Settings ![]() (right, on top) > Add an app > Name the document library “Invoice”.
(right, on top) > Add an app > Name the document library “Invoice”.
Go to the newly created document library. Open the Library ribbon, and edit library with SharePoint Designer. SharePoint Designer is not installed by default, and you may have to download and install it first.
After SharePoint Designer was installed, click again on “Edit Library” with SharePoint Designer. Within SharePoint designer, select Content Types and create a new Content Type. Call it “Invoice” and make sure to select the parent content type form “Document Content Types” and parent content type “Document”. Save your modifications.
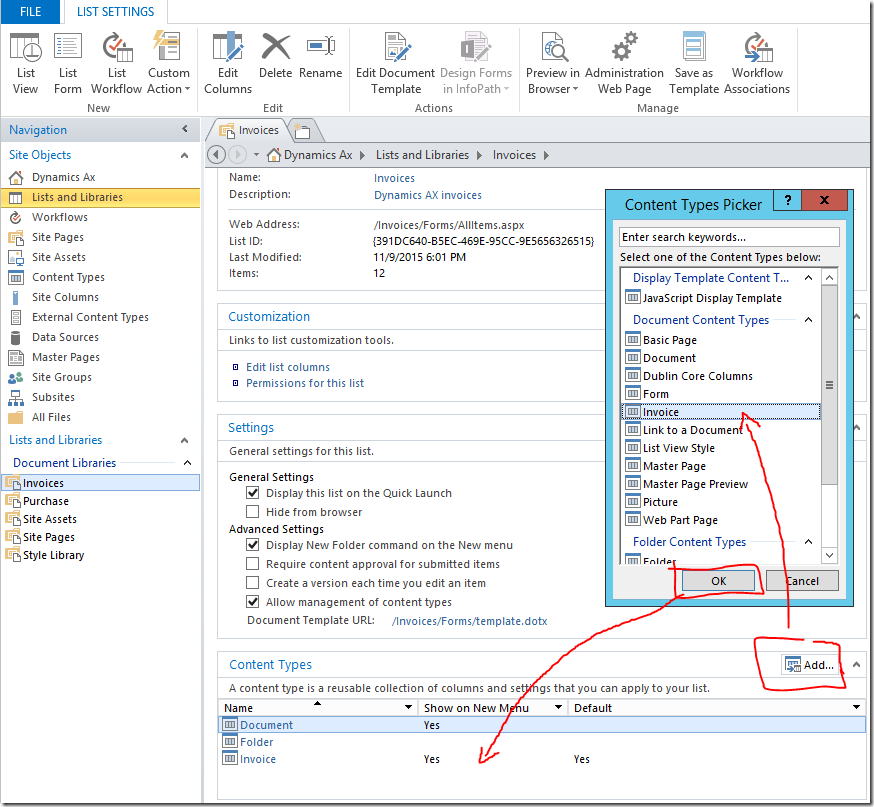
In the navigation, select Lists and Libraries and open the Invoices library. Make sure the option “Allow management of content types” is enabled. At the “Content Types” group at the bottom, open “Add” and select your newly created Invoice content type. This will add the content type to the document library.
Select the Invoice content type at the content types group. At the ribbon select “Set as default”. Now every new document uploaded to the library will be an Invoice type. Save your modifications and go back go SharePoint.
At the Invoices document library in SharePoint, open the Library Ribbon and choose “Open in Explorer”. This will open a new instance of windows explorer, showing the content of the document library.
Click in the address bar and copy the address.
Post and Publish Sales Invoice
Open Dynamics AX 2012 and go to “Accounts Receivable” > Periodic > Sales Update > Invoice. Change the Quantity to Packing Slip. Make sure the options “Posting”, “Late Selection” and “Post Invoice” are enabled.
Open “Select” and make sure the selection is configured to identify all Delivered sales orders. Click OK and save the selection.
Open Printer Setup > Invoice. Select File as Target and choose File Format PDF. Open the File Name Dialog and provide the Document Library Address as Target. Repeat this step for the Invoice (Copy).
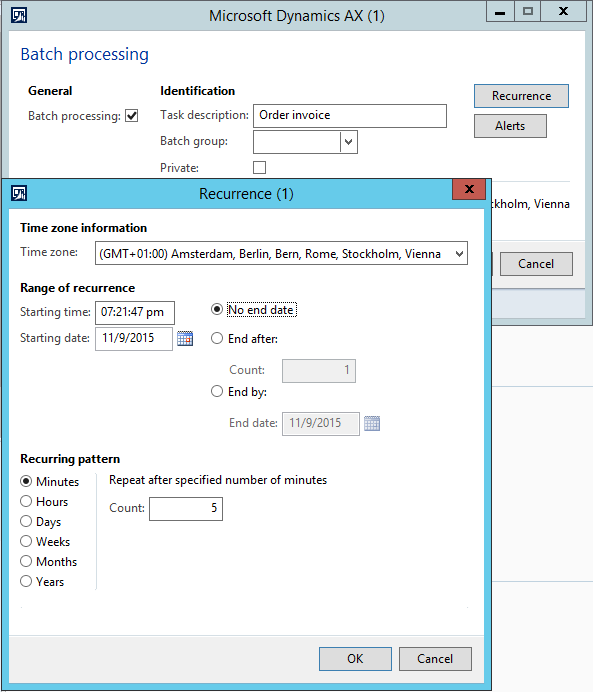
Back at the Posting Invoice Dialog, open Batch processing (at the bottom). Enable batch processing and modify the recurrence to “No End” and repeat all 5 minutes.
Test
In Dynamics AX create one or more new sales order and post the packing slip. Wait until the Post Invoice batch job runs. The sales orders should be invoiced. Go to SharePoint and open the Invoices document library. There you should see the uploaded PDFs.
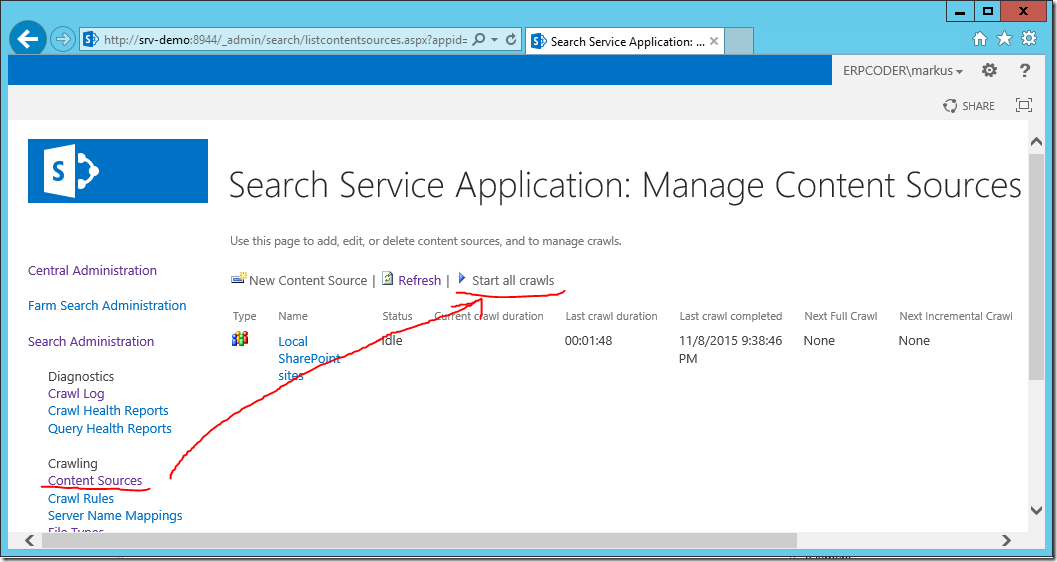
Open the SharePoint Central Administration and go to Application > Manage service application > Search Service Application.
Select Content Sources and start the crawl manually. This will force SharePoint to index the PDF files in the Invoices document library. By default the crawler indices the documents on SharePoint periodically without manual interaction.
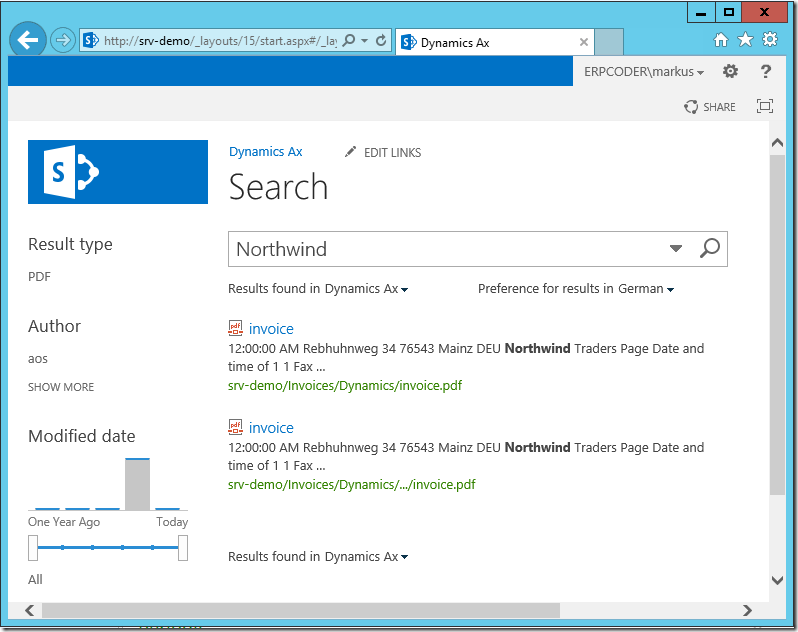
Open SharePoint Team Website. In the Search Box, type the Name of Customer. SharePoint will present a list of found documents related to the customer.
(Optional) Confirm and Publish Purchase Orders to SharePoint
Create a new document library with an purchase order content type as default:
Go to SharePoint, open the settings ![]() menu and choose to add an app. Select document library and name it Purchases. Navigate to the new document library, and from the Library Ribbon, select “Open with SharePoint Designer”. In SharePoint designer create a new content type, based on a document content type, and name it Purchase. In SharePoint Designer navigate to the libraries, select the newly created Purchases library and make sure the option “Allow Management of Content Types” is enabled. Below, at the content types group add the Purchase content type you’ve created. Finally select the content type, and from the ribbon in SharePoint designer select “Set as Default”.
menu and choose to add an app. Select document library and name it Purchases. Navigate to the new document library, and from the Library Ribbon, select “Open with SharePoint Designer”. In SharePoint designer create a new content type, based on a document content type, and name it Purchase. In SharePoint Designer navigate to the libraries, select the newly created Purchases library and make sure the option “Allow Management of Content Types” is enabled. Below, at the content types group add the Purchase content type you’ve created. Finally select the content type, and from the ribbon in SharePoint designer select “Set as Default”.
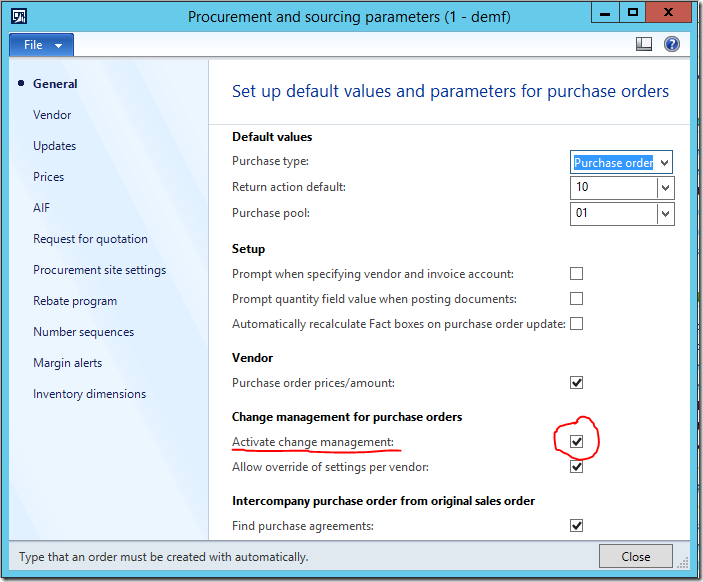
In Dynamics AX go to the Procurement and Sourcing module > Settings > Procurement and Sourcing Parameters > and activate Change Management. This option is required to run the purchase order approval workflow.
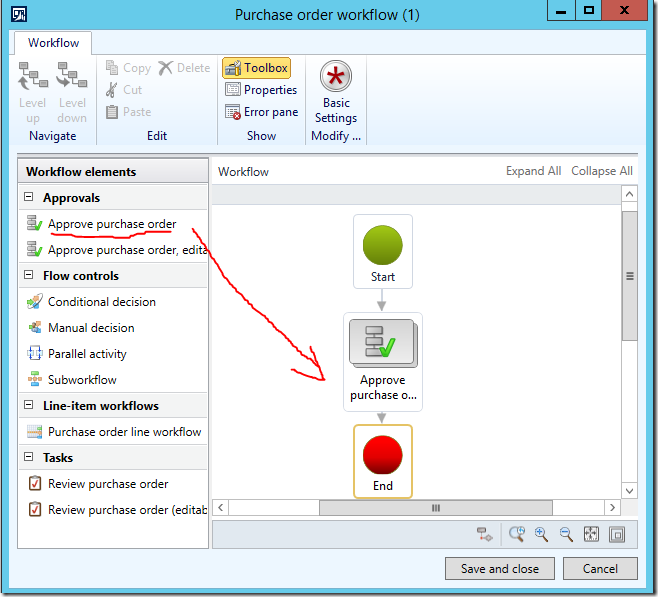
Next go to Procurement and Sourcing > Settings > Procurement and Sourcing Workflows. Create a new workflow based on the Purchase Order Workflow template. In the Workflow Configuration, add the Approve Purchase Order task to the workflow, between start and end.
Provide meaningful texts for the Workflow Submission instruction. Double click on the Approve Purchase Order taks to open the details. There assign Step 1 to a user or a user group. For testing purpose, you may assign the approval to yourself. Save and activate the workflow configuration.
Create a new purchase order. The purchase order starts in the approval state Draft. Submit it to the workflow for approval. This will change the state to “In Review”. Go back to the Purchase Order List Page and refresh the data. It may take a few minutes, depending on your workflow batch jobs configuration, until the purchase order is assigned to you for approval. When the purchase order is assigned for approval, approve the purchase and wait a few minutes until the purchase order has reached the state approved.
Go to Procurement and Sourcing > Periodic > Purchase orders > Confirmation. Make Sure the Options Posting, Late Selection and Print purchase orders are active. From the Select button on the right, make sure only Approved and Open purchase orders will be selected.
Open the Printer Setup > Purchase Order > Choose print to file as PDF and provide the path to the Purchases document library on your SharePoint. Repeat this for Printer Setup > Purchase Order (copy).
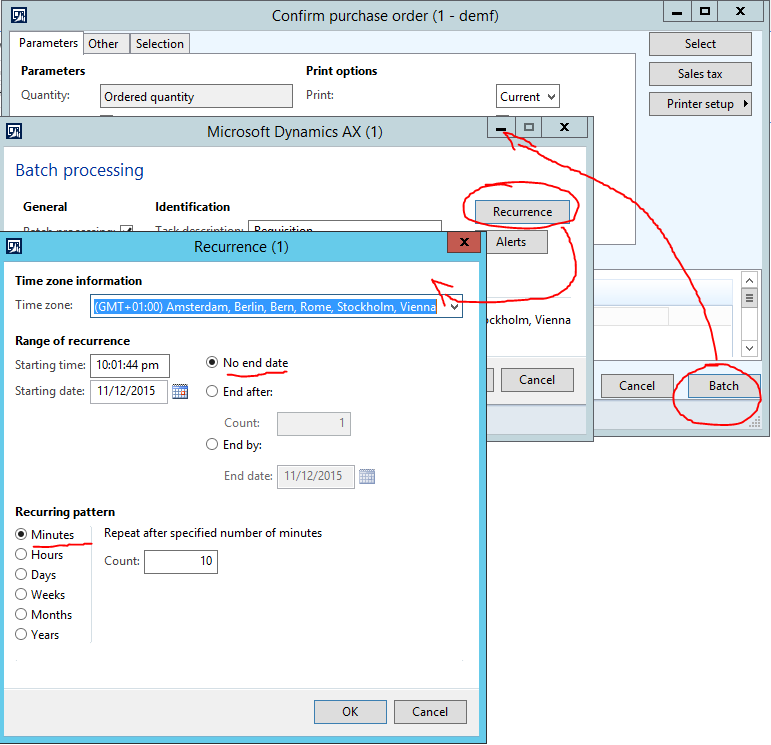
Finally, open the Batch dialog using the button on the lower right. Make sure to activate batch processing and set the recurrence to no end and recurring pattern to 10 minutes.
After a few minutes the purchase order state has change from Approved to Confirmed, and you should see the generated PDFs on SharePoint. These documents will be included within the next search crawl and can be found using the search box at your SharePoint website.
(Optional) Enhance Search Experience
Open SharePoint Central Administration and click the group Application Management. Go to “Create Site Collection” . Make sure your are using the same Web Application as the Team Website. Call the new site collection “Search” and provide an URL including like http://YOUR_SERVER/site/search. Make sure to select the “Basic Search Center” template from the Enterprise template group. Click OK, this will create a new basic search center.
Open the URL you have provided in a web browser. You should see an almost empty web page with a search box.
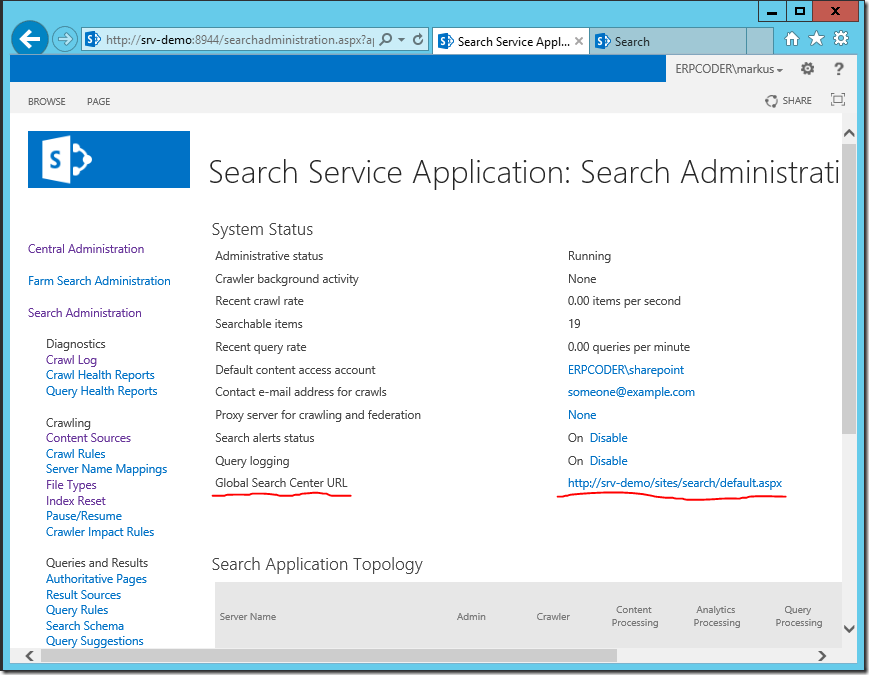
In SharePoint Central Administration go to “Application Management” > “Manage Service Applications” > “Search Service Application”. Provide the Search Center URL at the property “Global Search Center URL”. This will instruct SharePoint to redirect all search to the Search Center.
Open the Search Center URL in a browser and start a search e.g. for a Customer. This will open the result page. On the top right open the settings ![]() and click on “Edit page”. This will switch the page to edit mode. On the left side, click the drop down of the refiner web part and click “Edit Web Part”. This will open the Edit Dialog on the right.
and click on “Edit page”. This will switch the page to edit mode. On the left side, click the drop down of the refiner web part and click “Edit Web Part”. This will open the Edit Dialog on the right.
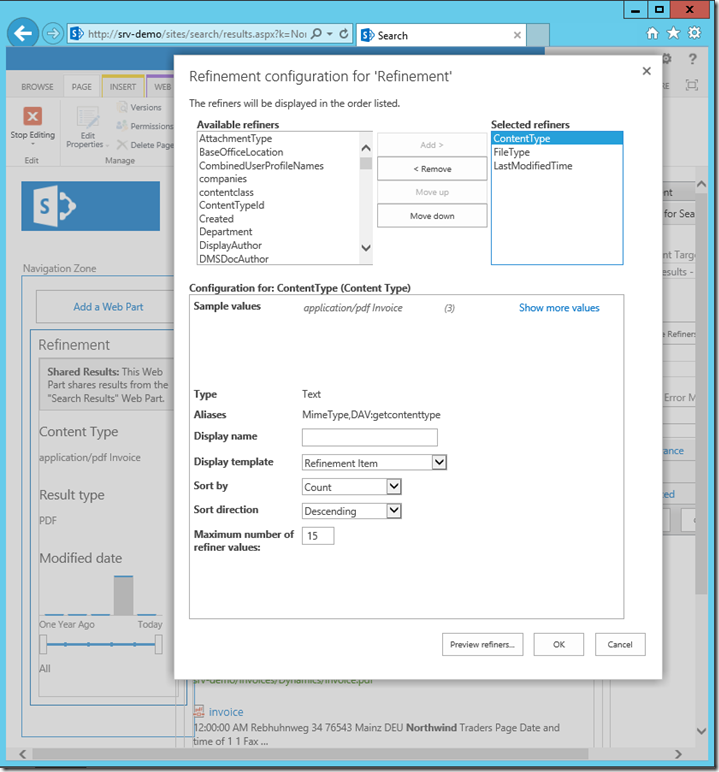
Click on “Choose Refiners” and make sure Content Type, File Type and Last Modified Time are selected. Remove all the other refiners from the select. Click OK in the dialog, Apply in the Web Part Configuration Dialog on the right and Stop Edition in the ribbon on the top left.
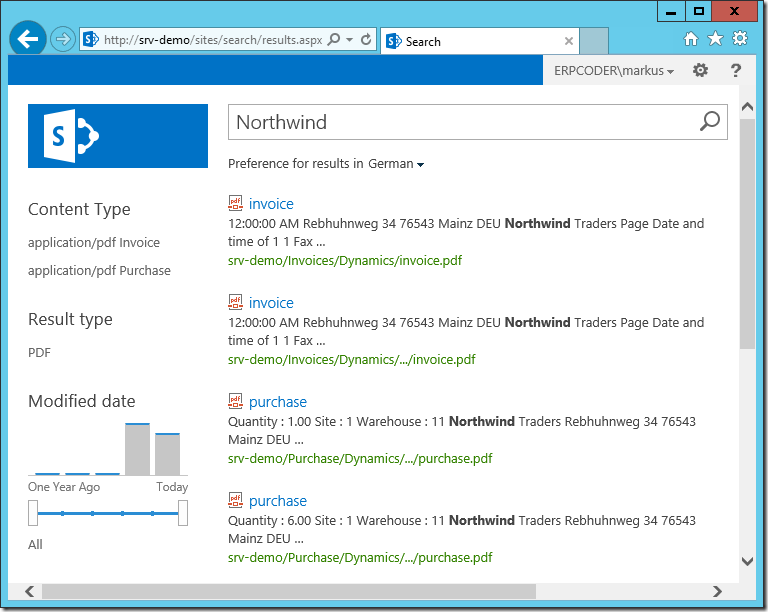
When you use the search center the next time, the result page will allow you to refine by Content Type like Invoice, Purchase Order, etc., File Type like PDF, Word, etc., and Date.


