Recently, Microsoft released an updated Demonstration VM for Dynamics AX 2012 R3 CU9. You can find it here on PartnerSource, and here on CustomerSource. For the last VM (CU8), I converted both the Virtual Hard Disk files (VHDs) and Virtual Machine Generation to the latest version supported by Hyper-V. I also made some other tweaks which might help with performance. Doing it again now for the CU9 VM, I thought I’d write down the steps. I’ve put them here for everyone to read, but this is a really long post, and gets quite technical (in a non-AX way) in places. If this doesn’t sound like something you want to do, I’d stop reading now. It might be that I’m the only person who finds this interesting or useful. If that’s the case, at least I’ve got it written down for next time!
The download for the Demo VM is spread over 38 files (each 1GB in size), so go ahead and download those, and come back when you’re finished.
Once the downloads are complete, you need to make sure all the files you’ve downloaded are in the same folder, and run the executable:
Although it opens an InstallShield Wizard, all it really does is unpack one of the 38 files you downloaded (and display a licence agreement, which I assume is the real reason for this step!). It offers to ‘Install’ it into C:Program Files. I would change it to the location which you downloaded the 38 files to. And once its done, you’ll have two executables in your folder. Now, run the one with ‘part001′ in the name:
It will trigger the unpacking of the 38 files, one by one. You can set the same folder you’ve used before as the destination for this step. Be aware that whereever you do it, you need nearly 110GB of free space. It will take a long time to complete – almost as long as it took me to download the 38 files in the first place.
When it’s done, you’ll have a word document, and a folder containing the VHDs and configuration of the Virtual Machine.
The VHDs are the ‘virtual hard disk’ files used by the VM. They are the VM’s C: and E: drives. C: contains Windows and the applications. E: contains the SQL database files.
At this point, you can delete the file you downloaded called ‘AX2012R3CU9DemoVMA.exe’. You’ll not need it again. You can also delete all of the files with the word ‘part’ in the name. Or, if you think you’ll need them again (maybe you’ll kill this instance of the VM one day, and want to start again), I normally copy them off to an external drive. Either way, we don’t need them now.
Before we boot it up, we’re going to convert the VHD files to the VHDX format. After we’ve booted it up (and made an important change within the VM) we’re going to convert the VM to Generation 2. If you’re hoping to squeeze better performance from your VM because of this, there is a crumb of hope for you. The VHDX format includes support for something called ‘4K logical sectors’. This is something that is only supported in the latest releases of Windows, and offers the potential for a performance increase.
I’m going to use a command line tool to convert the VHDs, and to make it easier, I’m going to move the whole of the AX2012R3A folder to the root of a drive, in this case my C: drive:
The tool we’ll use is called Convert-VHD, and you need to open PowerShell to run it:
The command I will use is:
Convert-VHD -Path "C:AX2012R3AVirtual Hard DisksAX2012R3A_OS.vhd" -DestinationPath "C:AX2012R3AVirtual Hard DisksAX2012R3A_OS.vhdx"
If you did not put your ‘AX2012R3A’ folder into the root of the C: drive, you’ll need to modify this. This step will require around 115GB free for the new VHDX files that get created. I have room for them on my C: drive, so I created them in the same place as my VHD files. If you don’t have room, modify the DestinationPath to create them on a different drive.
Put the command into the PowerShell window (hint – Paste is available by clicking the blue PowerShell icon at the top left of the window) and hit Enter:
The conversion will begin:
There is another command I will run, to set the sectors on the disk to the magical 4K size. The command is below. Just put it into the PowerShell window after conversion is complete:
Set-VHD -Path "C:AX2012R3AVirtual Hard DisksAX2012R3A_OS.vhdx" -PhysicalSectorSizeBytes 4096
Then repeat for the second VHD. The commands are:
Convert-VHD -Path "C:AX2012R3AVirtual Hard DisksAX2012R3A_Data.vhd" -DestinationPath "C:AX2012R3AVirtual Hard DisksAX2012R3A_Data.vhdx"
and
Set-VHD -Path "C:AX2012R3AVirtual Hard DisksAX2012R3A_Data.vhdx" -PhysicalSectorSizeBytes 4096
You can now delete the old VHD files, but leave the VHDX files alone!
At this point, I’m going to move the AX2012R3A folder to location I want it to live when I’m using the VM. I have a folder in my Documents called ‘My Virtual Machines’ and I’m going to put it there:
I also don’t like the name AX2012R3A, since no doubt the CU10 Demo VM will have the same name, and I won’t know which is which. So I rename it AX2012R3CU9. Finally, I’m not going to use the VM configuration provided by Microsoft. It is the XML file that is in the ‘Virtual Machines’ folder, and I’ll delete it that file. The configuration already won’t work, because it is looking for VHD files (and we don’t have any). It also wants a network card called ‘AX2012R3′, and that isn’t what mine is called.
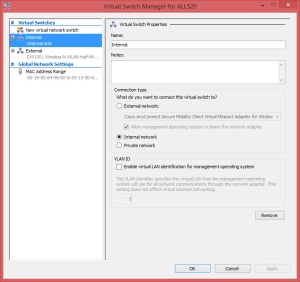
Instead, we’ll create a new configuration now. But first, we need an Internal network card to give to the VM. Open Hyper-V Manager, and then ‘Virtual Switch Manager’. (If Hyper-V Manager is not installed on your PC, you can add it by ‘Turn Windows features on or off’). If you already have an ‘Internal’ switch, that’s fine. If not, hit ‘Create Virtual Switch’. Call it ‘Internal’, and set the type to ‘Internal network’ then click Apply and OK.
Now we’re ready to create the VM. Click ‘Action’ -> ‘New’ -> Virtual Machine. Run through the Wizard. I’m going to call mine ‘AX2012R3CU9′, and I specify I want to save it in my ‘My Virtual Machines’ folder that I created:
On the next screen, select ‘Generation 1′. This is very important. You might think we can just go ahead and create a Generation 2 VM now. We can’t. The boot disk is not configured for Generation 2 and it won’t boot. On the next screen, give it as much RAM as you can afford. It wants 24GB (24,576 MB). I only have 16GB in my laptop, so I can’t give it that. I give it 12GB (12,288 MB). At ‘Configure Networking’, give it the Internal switch that you have. At ‘Connect Virtual Hard Disk’, choose ‘Use an existing..’ and point it to the VHDX for the OS:
Then we’re done. Well, not quite. But we’re done with the Wizard. But we still need to add the second VHDX file. Select your new VM, and choose ‘Settings’. On ‘IDE Controller 1′, there is a DVD Drive. I don’t need that, so I’ll Remove it and hit Apply:
On IDE Controller 1, I then add a Hard Drive. I point it at my Data VHDX, and click Apply:
When I’ve added the second Hard Disk, I’m ready to boot up the VM. Close the ‘Settings’ window, and Start the VM.
Once it has booted (and after you’ve logged in), I suggest going to Control Panel -> Network and Internet -> Network Connections, and re-naming the connection that exists to ‘Internal’. Later, I add an ‘External’ card, and knowing which is which might be useful one day. Whilst we’re in here, check the IP address that the Internal adapter has. If it begins with 169., it’s not got the right address. There’s a utility in the root of C: drive on the VM which will fix that. Browse to the utility (it’s called setnetworkip), right-click on it and choose ‘Run with PowerShell’. The utility will look for network adapters with an address in the 169. range and assign the correct address (in the 10.20.12.x range) to it. The network adapter should remember the address it’s been assigned, so you shouldn’t need to run this utility again.
Now at this point, we start the conversion of the VM to Generation 2. Generation 2 VMs are only supported by Windows 8.1 (or Windows Server 2012 R2, and I assume Windows 10). If you don’t have Hyper-V running on those operating systems, don’t do the conversion to Generation 2 part of this blog post.
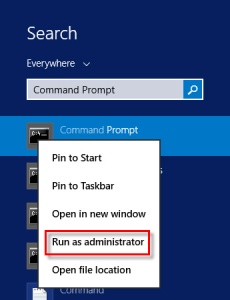
We’re going to use a utility that can be found here, on Part 10 of a blog post written by a Microsoft program manager on the Hyper-V team. On Part 8 of that blog, he describes that we have to disable something called the ‘Recovery environment’ on the Demo VM. You’re already logged into the Demo VM. Open Command Prompt as an Administrator:
Enter this command to disable the recovery environment:
reagentc /disable
Hopefully I’ll remember to enable that again later, after we’re done. Now, we’re ready to start the conversion, so shutdown the Demo VM. If you do it right, Hyper-V will report the ‘State’ of the VM as ‘Off’. Once that is done, close Hyper-V Manager.
Now you need to download a utility called ‘Convert-VMGeneration.ps1′. You can get it from Part 10 of that blog. I save it to the root of C: drive.
The utility will copy the OS VHDX into a VHDX which is formatted for Generation 2. To do this, it needs to create an image of the Generation 1 VHDX file. That means at one time it needs three times the space of the OS VHDX. I don’t have enough space for that on my C: drive, so I use a parameter (the ‘WIM’ parameter) to tell it to create the image on my D: drive. I have space on my D: drive, and when the utility is finished with the image it will delete it. So my command to launch the utility looks like this:
.Convert-VMGeneration.ps1 -VMName AX2012R3CU9 -Action All -Path "C:Usersguy.terryDocumentsMy Virtual Machines" -WIM D:temporary.wim -NewVMName AX2012R3_CU9
I’ve told it the name of the VM I wish to convert, and I’ve told it the ‘Path’ to put my new VM in. The ‘WIM’ parameter tells it to temporarily create a file on my D: drive, and the final parameter is the name of my new VM (it has an underscore in it to differentiate it from the old VM).
Again, we run the utility in PowerShell, which you open as an Administrator. Use this command to move to the root of C: drive (which is where I saved the utility):
cd /
Then paste in the command:
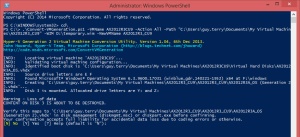
When it starts, there is a lot going on very quickly. You might notice Windows Explorer opens, with some odd drive letters. The utility has mapped the Demo VMs drives – it’s nothing to be alarmed about. After that though, it stops, waiting for your input. It is telling you that it is about to erase the data on a disk, and wants you to check its got the right one. It has created a new disk for your Generation 2 OS VHDX and wants you to check that this is the disk it is erasing. In my screenshot, it says it will erase Disk 3, and that I should open Disk Management to check what Disk 3 is:
You’re on your own at this point. If it has got it wrong and you lose something important, I can’t help you. If you’re not comfortable, answer ‘N’ and skip this part of the blog. I checked in Disk Management and I can see that all my important data is on Disk 0 and Disk 1, so I answer ‘Y’.
After some time (I think more than an hour), the utility reports that it is finished:
The new VM appears alongside the original in Hyper-V Manager. I have to do a little tidying. I delete the original VM. The utility has only converted the boot disk. The E: drive is attached to the new VM, but in its old location. So I remove the second disk from the VM, move the Data VHDX file to the location I want, and then add the second disk back to the VM. I also give the VM 4 processors, instead of 1.
When the VM has booted, remember to open the command prompt as an Administrator and re-enabled the Recovery Environment:
reagentc /enable
If you were skipping the ‘Convert to Generation 2′ part, this is where you pick up again, because unfortunately, we’re not done there (although you should find AX works fine, and you can use the VM). The VM Profile Manager makes a welcome return in the CU9 Demo VM, and by default it is set to give you the full demo experience. Personally, I don’t need any of the Retail POS stuff, so I open the VM Profile Manager, and on the ‘Settings’ tab I set the profile to ‘Minimum’.
Shut down the VM, so that we can check the VM Profile Manager loads a smaller set of applications when we re-boot. But whilst it’s shut down, I create a second switch in ‘Virtual Switch Manager’. This time, it’s an external one, and will allow the VM to communicate to the internet. When you create the switch, select whichever network adapter you want it to use to access the internet. I normally choose my wireless adapter, since it is much more likely that I’ll have a wireless connection than a cabled one. Add this new ‘External’ adapter to the VM, and power it up.
This time when I boot, I can see a whole bunch of windows services (e.g. ten with Retail Commerce Data Exchange in the name) which haven’t started. Good! Go to Control Panel -> Network and Internet -> Network Connections and rename the new network connection ‘External’.
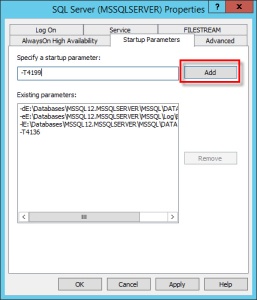
I think we’re nearly done now. I do one more thing, which may help with performance. There are a couple of SQL Trace Flags I like to turn on. They are T4136 & T4199. If you want to know why I turn them on, look here. To enable them, open SQL Server 2014 Configuration Manager. On the left, click on ‘SQL Server Services’. On the right, find ‘SQL Server (MSSQLSERVER)’. Right-click on it and choose ‘Properties’. Head to the ‘Startup Parameters’ tab. Use the ‘Add’ button to add each flag in turn, using the exact format shown in the screenshot (a dash in front, and no spaces):
They’ll take effect the next time you reboot the VM.
So that’s pretty much it. There are other things I do, which I won’t write about here. You might put the latest SQL service pack and CU on (SQL Server 2014 RTM is on the VM). You might install the latest windows updates. I set the Time Zone and other language settings in Windows to United Kingdom. I turn off a lot of stuff in the AX Licence Configuration that I will never use (like some Russian functionality, US Payroll stuff, the Public sector functionality) or functionality that barges its way onto many forms (e.g. Catch weight). You might also want to think about disabling WMSII (since it’s not supported with Warehouse management).
Well, that was far too long a post. Its my notes for the next time I do this really, but if it helps one or two others then that’s even better.


