Today when I am writing this post, configuration of power view tool with Dynamics AX is one of the hectic issue. I tried to summaries each and every steps and point major issues which I faced during configuring Power View tool for Dynamics AX.
Install SQL server 2012, SP1, CU4
Install Office SharePoint Server 2010, SP1
Configure SharePoint Server 2010 and localhost
Install PowerPvoit from SQL server installation direction
Configure SQL server PowerPvoit
Create Reporting Services Service Application site on SharePoint
Install Dynamics AX 2012 R2 or latest build
Install SSRS/BI/EP component
After completion of SQL server SP1 installation, you have to install SQL server 2012 CU4 from following link:
http://support.microsoft.com/kb/2758687
Now you can see you SQL version like this:
Installation of SharePoint Server 2010
Now you have to install Office SharePoint Server 2010 before moving forward, if you have SharePoint Foundation 2010, you have to uninstall it first.


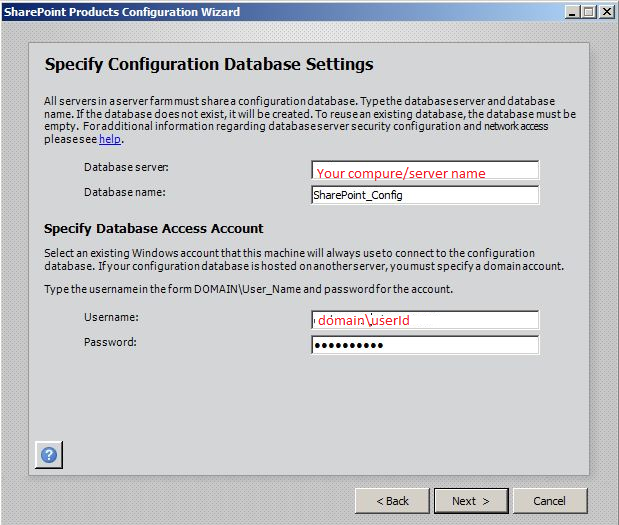
On the Specify Configuration Database Settings page enter your database server name. Keep the default name for the Database name or enter the required database name for create the SharePoint Configure database. Type the Username and Password to access the Database
Note: Enter the domain account you chosen for installation as User Name with domain name. Example: domainabcxzy


The system displays the Configuration Successful page as shown below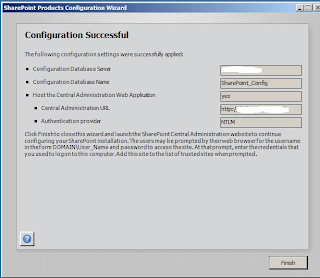
Install SQL server 2012, SP1, CU4
Install Office SharePoint Server 2010, SP1
Configure SharePoint Server 2010 and localhost
Install PowerPvoit from SQL server installation direction
Configure SQL server PowerPvoit
Create Reporting Services Service Application site on SharePoint
Install Dynamics AX 2012 R2 or latest build
Install SSRS/BI/EP component
Introduction
Power View is an interactive data exploration and presentation experience that was introduced in SQL Server 2012. To make it easier to correctly install and configure the components required for use of Power View, this document provides detailed steps to install and configure Power View including the following tasks:Installation of SQL server 2012 Enterprise
Installation of SharePoint 2010 Server
Configuration of SharePoint and Power View
Installation of Dynamics AX BI, SSRS and EP components
Installing PowerPivot and Reporting Services on a new single-server SharePoint 2010 farm is the simplest way to get started with SQL Server “Denali” (Denali is code name of SQL server 2012). The steps presented in this document should have you up and running in less than a couple of hours. Before you start the installation, make sure that:
- You have a clean 64-bit Windows Server 2008 R2 machine that has all the latest updates. (These are the only operating systems supported by SharePoint 2010.)
- You have at least one domain account that you can use to provision the services (a domain account is required to successfully configure SharePoint 2010 and PowerPivot for SharePoint) and that your computer is connected to that domain.
- Port 80 is available.
- Power View is supported by SQL server 2012, you have to clean your system if you have SQL 2008 installed.
Installation of SQL Server 2012
You have to install SQL server 2012 as a base step, during installation you can have to select at least following options (I used “Select All” features):Database Engine Services
Analysis Services
Reporting Services - SharePoint
Reporting Services Add-in for SharePoint Products
Client Tools Connectivity
SQL Server Data Tools
Management Tools - Basic
Management Tools - Complete
Analysis Services
Reporting Services - SharePoint
Reporting Services Add-in for SharePoint Products
Client Tools Connectivity
SQL Server Data Tools
Management Tools - Basic
Management Tools - Complete
After installing SQL server base version you have to install SQL Server 2012 SP1, you can download it form following link:
http://www.microsoft.com/en-us/download/details.aspx?id=35575use (SQLServer2012SP1-FullSlipstream-ENU-x64.iso)
http://www.microsoft.com/en-us/download/details.aspx?id=35575use (SQLServer2012SP1-FullSlipstream-ENU-x64.iso)
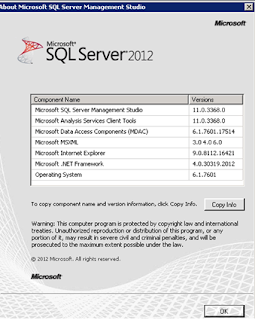
After completion of SQL server SP1 installation, you have to install SQL server 2012 CU4 from following link:
http://support.microsoft.com/kb/2758687
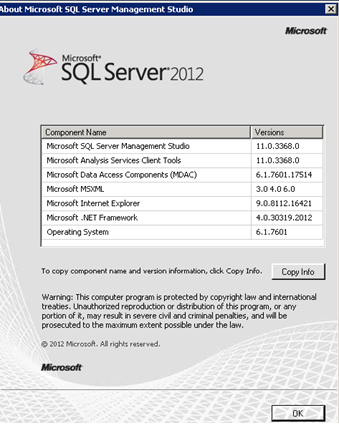
Now you can see you SQL version like this:
Now you are done with SQL server installation part 1. Next step is to install SharePoint Server 2010
Installation of SharePoint Server 2010
Now you have to install Office SharePoint Server 2010 before moving forward, if you have SharePoint Foundation 2010, you have to uninstall it first. a. Double-click PrerequisiteInstaller.exe from your SharePoint Server 2010 setup location to launch the SharePoint 2010 Products Preparation Tool. Note that you will need network connectivity to run PrerequisiteInstaller.exe.
b. After the preparation tool completes successfully, open Setup.exe.
c. Enter a product key, accept the terms and conditions, and then click Continue.
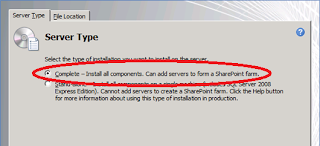
d. Click Server Farm, and then click Next.
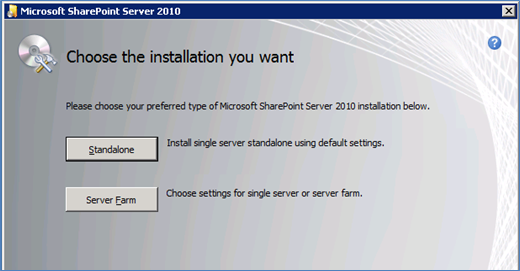
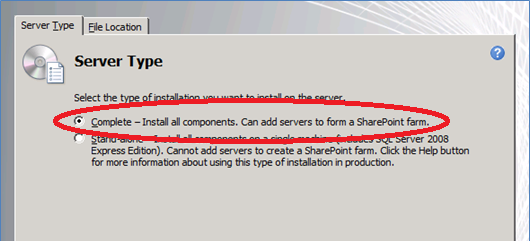
e. On the Server Type tab, click Complete, and then click Install Now.
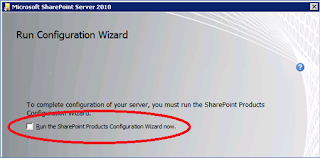
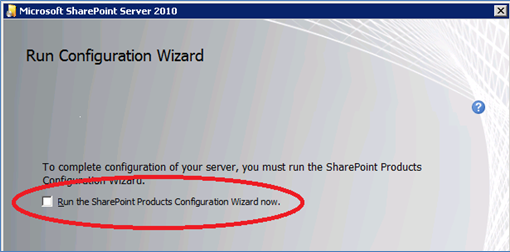
f. Important: After the installation is complete, a message appears, asking whether you want to run the Configuration Wizard. Do notrun this. Clear the Run the SharePoint Products Configuration Wizard now check box, and then click Close.
Now you have to install SharePoint 2010 SP1, you can download and install it form following location:
Configure SharePoint Server 2010 Central Administration
After installing SharePoint Server 2010, you can run Central administration wizard.
- Click Start, All Programs, Microsoft SharePoint 2010 Products, SharePoint 2010 Products Configuration Wizard
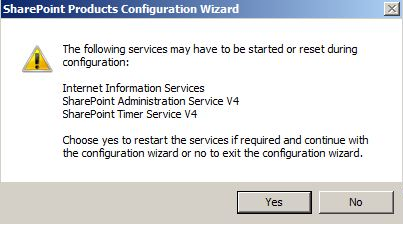
At the Welcome to SharePoint Products and Technologies page, click Next

A confirmation dialog message appears that displays a list of services that may have to be restarted. Click Yes
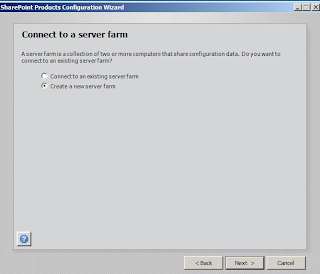
On the Connect to a server farm page. Select the Create a new server farm and click the Next button to continue
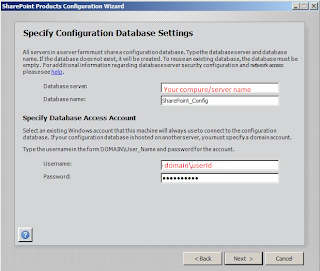
On the Specify Configuration Database Settings page enter your database server name. Keep the default name for the Database name or enter the required database name for create the SharePoint Configure database. Type the Username and Password to access the Database
Note: Enter the domain account you chosen for installation as User Name with domain name. Example: domainabcxzy
Enter and confirm the Passphrase on Specify Farm Security Settings page; Click Next to continue

Review the configuration settings defined in previous steps will be displayed on Completing the SharePoint Products Configuration Wizard. Click the Next button to continue.
The system displays the Configuring SharePoint Products progress page as below

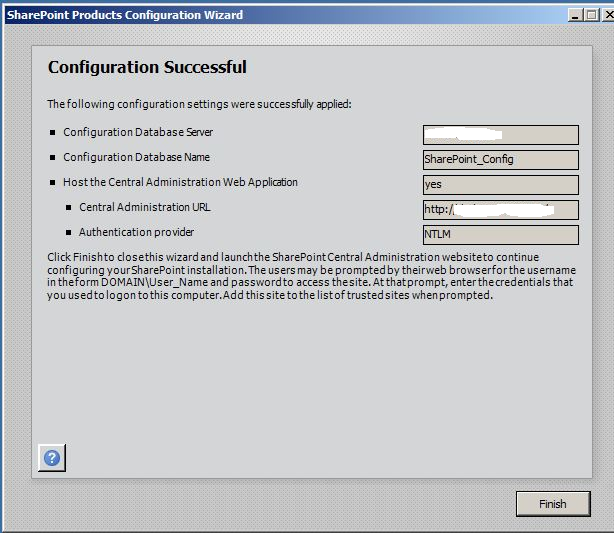
The system displays the Configuration Successful page as shown below
- Click the Finish button to close the configuration wizard. The system automatically launches the new SharePoint Central Administration site with Help Make SharePoint Better window.
- Select to participate or select not to participate and click OK button to continue
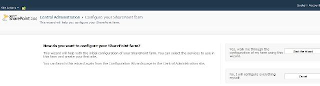
- The system displays the Configure your SharePoint farm page as shown below

Now after completion of above step, you have to create new Site in SharePoint for port 80 from following link:
Remember if you have Office 2013 installed you have to do some tricks otherwise configuration will failed. If you encountering following issue, you can override it:
Delete following folder from C:WindowsassemblyGAC_MSIL I was able to configure Central admin for SharePoint 2010:
Policy.14.0.Microsoft.Office.InfoPath
Policy.14.0.Microsoft.Office.InfoPath.Client.Internal.Host
Policy.14.0.Microsoft.Office.InfoPath.FormControl
Failed to create the configuration database.
An exception of type Microsoft.SharePoint.Upgrade.SPUpgradeException was thrown. Additional exception information: Failed to call GetTypes on assembly Microsoft.Office.InfoPath.Server, Version=14.0.0.0, Culture=neutral, PublicKeyToken=71e9bce111e9429c. Could not load file or assembly 'Microsoft.Office.InfoPath, V…….
Run SQL Server setup to install PowerPivot for SharePoint
This step will configure your SharePoint farm and install PowerPivot. It will also customize your farm with recommended settings for a PowerPivot installation.
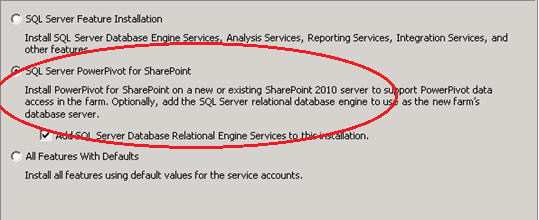
a. Launch Microsoft SQL Server setup, click the Installation tab, and then click New SQL Server stand-alone installation.
b. Enter the product key when prompted and navigate through Setup, selecting the defaults until you reach the Setup Role page.
c. Select SQL Server PowerPivot for SharePoint, and then leave the Add SQL Server Database Relational Engine Services to this installationcheckbox selected. Click Next.
d. On the Feature Selection page, click Next, and then continue navigating through the defaults until you reach the Server Configuration page.
e. On the Server Configuration page, enter service accounts for each SQL Server service. The Analysis Services Service Account must be a domain account. Click Next to go to the Database Engine Configuration page.
f. On the Database Engine Configuration page, enter the name of an administrator for SQL Server (you can click on Add Current User to ensure that you are a SQL Server system administrator). Click Next to go to the Analysis Services Configurationpage.
g. On the Analysis Services Configuration page, specify who will be an administrator of Analysis Services. At a minimum, click Add Current User to ensure you are an administrator (you can remove yourself from this role later, but in order for PowerPivot to deploy correctly in the farm, the person running Setup must be an Analysis Services administrator). Click Add if you want to add additional users as administrators. Continue to navigate through Setup.
h. On the Ready to Install page, click Installto begin installation.
i. After setup completes successfully, click Please launch the PowerPivot Configuration Tool to configure the server.
After doing above step, you have to validate following optiona available on Central Admin site:
a. Click SharePointCentral Administration > Application Management > Manage service applications.
Click New > SQL Server Reporting Services Service Application.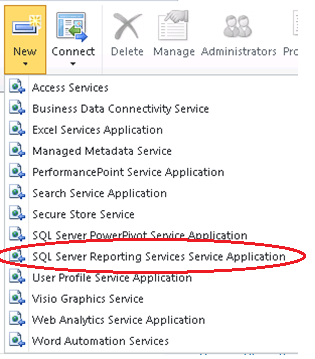
If the above option is not available, perform following steps:
1. Click the Start button
2. Click the Microsoft SharePoint 2010 Products group.
3. Right-click SharePoint 2010 Management Shell click Run as administrator.
4. Run the following PowerShell command to install the SharePoint service. A successful completion of the command displays a new line in the management shell. No message is returned to the management shell when the command completes successfully:
Install-SPRSService
5. Run the following PowerShell command to install the service proxy:
Install-SPRSServiceProxy 6. Run the following PowerShell command to start the service or see the following notes for instructions to start the service from SharePoint Central administration:
get-spserviceinstance -all |where {$_.TypeName -like "SQL Server Reporting*"} | Start-SPServiceInstance Restart IIs by using “iisreset” command from Start>Run
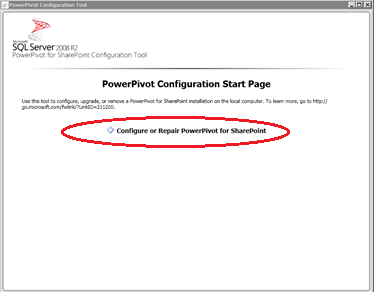
Run the PowerPivot Configuration Tool
This tool (new in CTP3) performs the SharePoint Integration and configuration steps required for PowerPivot.
Click Configure or Repair PowerPivot for SharePoint on the start page.
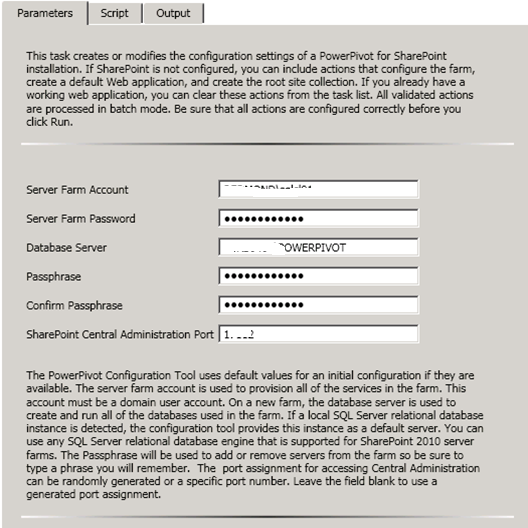
- On the Configure or repair PowerPivot for SharePoint page, enter the domain user account you are using to configure your server and specify a pass phrase that meets your organization’s standard password requirements. (Important: Make a note of this pass phrase, because you will need it if you want to add additional machines to your single server farm later.)
The database Server (the instance you installed in step 3 above) is already filled out for you. You can change this to a different instance if you would like to.
You can leave the default port number chosen for the Central Administration website or enter a port number of your choice. Note that you should write down the port number if you want to remotely administer the system. If you will be administering the system from several sites, consider selecting a number that is easy to remember. For example, 55000 would result in a remote Central Administration URL of http://
Click Validate once you have entered the above information.
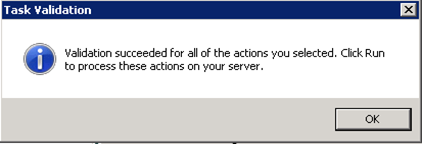
If you entered the correct information validation should succeed and display the following message.:
Create Reporting Services Service Application
1. In SharePoint Central Administration, in the Application Management group, click Manage Service Applications.
2. In the SharePoint ribbon, click the New button.
3. In the New menu, click SQL Server Reporting Services Service Application.
Caution
If the Reporting Services option does not appear in the list, it is an indication that the shared service is not installed. Review the previous section on how to use PowerShell cmdlts to install the Reporting Services service.
4. In the Create SQL Server Reporting Services Service Application page, enter a name for the application. If you are creating multiple Reporting Services service applications, a descriptive name or naming convention helps you organize your administration and management operations.
5. In Application Pool section, create a new application pool for the application (recommended). Using the same name for the new application pool as the service application, makes ongoing administration easier.
Select or create a managed account for the application pool. Be sure to specify a domain user account. A domain user account enables the use of the SharePoint managed account feature, which lets you update passwords and account information in one place. Domain accounts are also required if you plan to scale out the deployment to include additional service instances that run under the same identity.
6. In the Database Server, you can use the current server or choose a different SQL Server.
7. In Database Name the default value is ReportingService_, which is a unique database name. If you type a new value, type a unique value.
8. In Database Authentication, the default is Windows Authentication. If you choose SQL Authentication, refer to the SharePoint administrator guide for best practices on how to use this authentication type in a SharePoint deployment.
9. In the Web Application Association section, select the Web Application to be provisioned for access by the current Reporting Services Service Application. You can associate one Reporting Services service application to one web application. If all of the current web applications are already associated with a Reporting Services service application, you see a warning message.
10. Click OK.
11. The process to create a service application could take several minutes to complete. When it is complete, you will see a confirmation message and a link to a Provision Subscriptions and Alerts page. Complete the provision step if you want to use the Reporting Services subscriptions and alerts features
Now you are done with Installation and configuration of Power View w.r.t SQL server and SharePoint, next step is to install Dynamics AX 2012 R2 or later build and install SSRS reporting extension and Analysis Service from Ax setup file. Now open Dynamics AX and check following method exist or not, if not, you have create a new method:
ClassesSrsReportHelper
public staticvoid removeFromCache(str key)
{
key = strLwr(key);
if (SrsReportHelper::existsInCache(key))
{
classFactory.lastValueDelete('', '', UtilElementType::Enum, key);
}
}
Now you can install Dynamics AX EP component.
Power View is ready for Dynamics AX !!!!!!!!!!!!!!!
Happy DAXing